MacKarl's MacHelp
Karl Bastian's Mac Tips and Tricks. See his main blog at www.kidologist.com
Saturday, February 03, 2007
Capture Anything On Your Screen
Yet another awesome feature that comes on every Mac. You want a clean image of something
you see on your screen. Maybe it is a photo you can't download, an image you made, or perhaps just part of an image? Want to add an arrow or circle? Turn a PowerPoint slide into an image with ease. (no export as JPG and edit/resize/reduce).
OPTION 1:
Well, on a PC you can take a ScreenShot (some PCs that is), you can as well on a Mac. The command is Apple-Shift-3 and if you have your volume up you will hear a camera shutter telling you there is now a PNG file on your desktop named "Picture 1" and it will continue to number them if you make several. Open by double-clicking, and unless you changed your default opener, Preview will open the file. Select the area you want and hit Apple-K (you know i like that!) and it will crop. Hit Apple-S and it will save cutting out whatever was outside your crop.
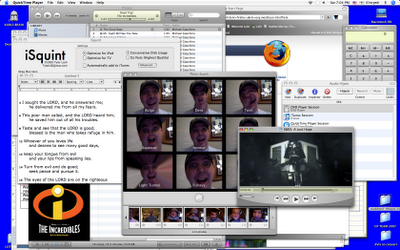
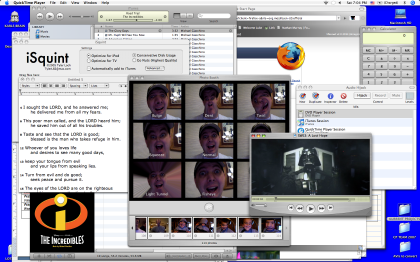
but suppose you only want a SMALL PART of this entire screen shot, say one of the funny pictures of me in the PhotoBooth Program?

OPTION 2: (what makes a Mac a Mac!)
Instead of taking the whole screen and cropping, you can also simply hit Apple-Shift-4 and look at your cursor! It is now a cross hair! Simply drag over what you want and release, now your perfectly cropped image is on the desktop as a PNG. You can resave to a different format, but PNGs are nice, the are crisp and clean and relatively small in file size.
SAMPLE:
To make my CP Team Map (from Kidology.org) I simply create the image in PowerPoint (which I use oten as a graphic layout program, not just presentations, since it is the most flexible program I've ever seen for laying out pictures, text, shapes, etc.) And then I make the window to the size I want and Apple-Shift-4 my image:
 On this blog post, I wanted to point out this climber by showing just the zoomed in part of the image. So I put the full image in PowerPoint, then zoomed in closer in iPhoto, did an Apple-Shift-4 capture (not worth the time of duplicating, editing, exporting, etc. for a one time use image) and dropped the "Picture 1" into PowerPoint, added the circle and arrow (PowerPoint shapes), and then Apple-Shift-4 again for the final image. Takes literally seconds to create an image that would not be worth the time to do it the usual way. (the PC way)
 Have fun! You will discover all kinds of fun applications for this yet-another-built in feature of the Mac!
2 Comments so far
you see on your screen. Maybe it is a photo you can't download, an image you made, or perhaps just part of an image? Want to add an arrow or circle? Turn a PowerPoint slide into an image with ease. (no export as JPG and edit/resize/reduce).
OPTION 1:
Well, on a PC you can take a ScreenShot (some PCs that is), you can as well on a Mac. The command is Apple-Shift-3 and if you have your volume up you will hear a camera shutter telling you there is now a PNG file on your desktop named "Picture 1" and it will continue to number them if you make several. Open by double-clicking, and unless you changed your default opener, Preview will open the file. Select the area you want and hit Apple-K (you know i like that!) and it will crop. Hit Apple-S and it will save cutting out whatever was outside your crop.
but suppose you only want a SMALL PART of this entire screen shot, say one of the funny pictures of me in the PhotoBooth Program?

OPTION 2: (what makes a Mac a Mac!)
Instead of taking the whole screen and cropping, you can also simply hit Apple-Shift-4 and look at your cursor! It is now a cross hair! Simply drag over what you want and release, now your perfectly cropped image is on the desktop as a PNG. You can resave to a different format, but PNGs are nice, the are crisp and clean and relatively small in file size.
SAMPLE:
To make my CP Team Map (from Kidology.org) I simply create the image in PowerPoint (which I use oten as a graphic layout program, not just presentations, since it is the most flexible program I've ever seen for laying out pictures, text, shapes, etc.) And then I make the window to the size I want and Apple-Shift-4 my image:
 On this blog post, I wanted to point out this climber by showing just the zoomed in part of the image. So I put the full image in PowerPoint, then zoomed in closer in iPhoto, did an Apple-Shift-4 capture (not worth the time of duplicating, editing, exporting, etc. for a one time use image) and dropped the "Picture 1" into PowerPoint, added the circle and arrow (PowerPoint shapes), and then Apple-Shift-4 again for the final image. Takes literally seconds to create an image that would not be worth the time to do it the usual way. (the PC way)Have fun! You will discover all kinds of fun applications for this yet-another-built in feature of the Mac!
2 Comments so far
Changing Icons on a Mac
I use NoteTaker for keeping track of TONS of information, and I wanted FAST EASY acccess to it on my desktop, but I didn't want to keep the actual data file on my desktop. What did I do? Create a cool alias icon that opens a file I open every day.
It now looks like this:
 But it originally looked like this:
 How do you turn a boring program icon into a fun "Clone Trooper?"
FIRST OF ALL: Note the litte 'arrow' in the lower left? That means it is an Alisa icon. (same a shortcut on PCs) This means that the icon is NOT the actual data file, but just an icon that directs the computer to the actual file. To make an icon, go to where the file is you want to make an Alias for (ANY kind of file, even a Word doc you open a lot and don't like navigating too, but don't want to keep permanently on the desktop... nice for projects, you can make a temporary alias until the project is done, but keep the file where it should be filed away deep in your file folder structure perhaps) Highlight icon (click on once) command click and choose make Alias. Highlight Alias and hit enter, you can edit the name to something more creative, like "KARLS BRAIN." Then you can drag that Alias icon to the desktop.
NOW TO CHANGE THE BORING ICON. Open the Information panel for the icon you want to get rid of, AND the icon you want. (btw, you can 'steal' an icon from any icon you can find on your computer, or seach online for Mac Icons and down them)
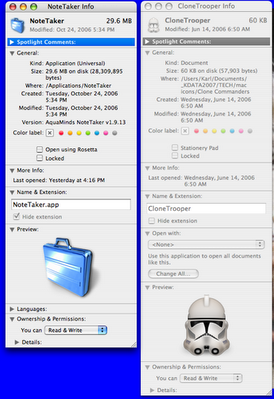 At the bottom you see a large image of the icon, BUT it is the little one at the TOP you want. This is SO EASY!
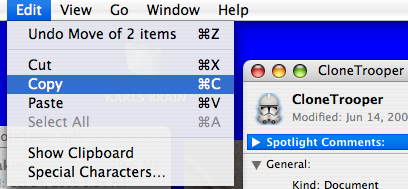
1) click once on the icon you WANT, and a blue glow/outline will appear around it, and click Edit/Copy:
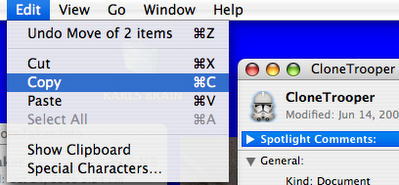
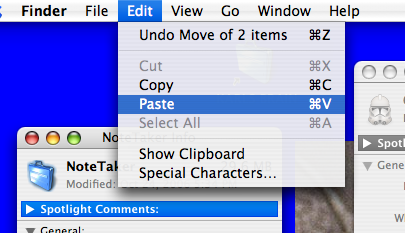
2) Click on the icon you want to CHANGE (look for the blue glow/outline) and click Edit/Paste
 And you have changed the icon!
HERE IS A DOWNLOAD LINK for the Clone Trooper icons!
0 Comments so far
It now looks like this:
 But it originally looked like this:
 How do you turn a boring program icon into a fun "Clone Trooper?"
FIRST OF ALL: Note the litte 'arrow' in the lower left? That means it is an Alisa icon. (same a shortcut on PCs) This means that the icon is NOT the actual data file, but just an icon that directs the computer to the actual file. To make an icon, go to where the file is you want to make an Alias for (ANY kind of file, even a Word doc you open a lot and don't like navigating too, but don't want to keep permanently on the desktop... nice for projects, you can make a temporary alias until the project is done, but keep the file where it should be filed away deep in your file folder structure perhaps) Highlight icon (click on once) command click and choose make Alias. Highlight Alias and hit enter, you can edit the name to something more creative, like "KARLS BRAIN." Then you can drag that Alias icon to the desktop.
NOW TO CHANGE THE BORING ICON. Open the Information panel for the icon you want to get rid of, AND the icon you want. (btw, you can 'steal' an icon from any icon you can find on your computer, or seach online for Mac Icons and down them)
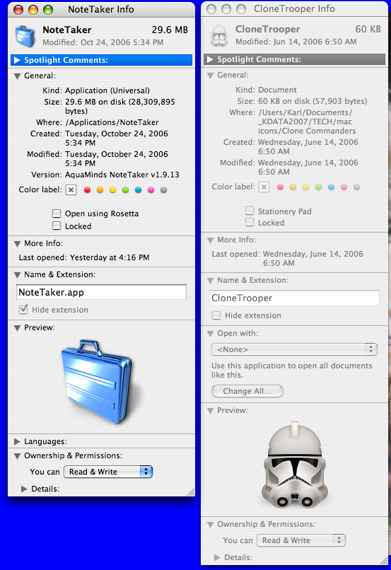 At the bottom you see a large image of the icon, BUT it is the little one at the TOP you want. This is SO EASY!
1) click once on the icon you WANT, and a blue glow/outline will appear around it, and click Edit/Copy:
2) Click on the icon you want to CHANGE (look for the blue glow/outline) and click Edit/Paste
 And you have changed the icon!
WANT TO PRACTICE?
HERE IS A DOWNLOAD LINK for the Clone Trooper icons!
0 Comments so far
Thursday, February 01, 2007
Best Place to Get Mac Software
If you ever need any software for your Mac, either a specific title, or you wonder if there is anything out there that might do what you need (like play Windows Media Files in QuickTime*) you can go to Version Tracker ( www.versiontracker.com )and search. Nearly all Mac software is available there - often for free, but many trial versions as well.
I recently bought the Trial Version of NoteTaker and ended up buying it as a GREAT place to keep track of miscellaneous and sensitive data because you can 'close the cover' like a book and require a password to open. I found this after seaching for note taking, notebook, etc.
I also went specifically to get Audio Hijack - a program that lets you OVERRIDE the limited speaker levels on your MacBook/PowerBook. FCC laws limit how loud your Mac is allowed to be in public, but this program eables you to hijack the audio controllers and boost louder than normal, which is great for me since I am deaf in one ear anyway!
ALSO: It allows you to record ANYTHING playing through your speakers, whether it is web streaming or CD or a website, so you can capture ANY audio your Mac can play. The Pro version allows you to input audio through the mic in port next to the headphone jack. Why would you want to do that? I can finally get all those cassette tapes recorded digitally!
HINT: (from my Mac Expert Friend Dave G.) Instead of buying the Audio Hijack Pro for $30, but the Audio Hijack for $15, and pay for the $15 upgrade for pro. Then you end up owning BOTH versions for the same cost of $30. Why? Because for most uses the normal version is faster and simpler to use, but you'll have the Pro for when you need the extra features.
* Yes, there is a way to convert QT to WMV, it is called Flip 4 Mac: www.flip4mac.com it will also allow you to convert QT to WMV if you buy the Pro version.
0 Comments so far
Archives
![]()
Copyright Karl Bastian 2005